Sunday, August 28, 2011

A HERO'S JOURNEY

A Hero’s Journey – or should I say Heroin’s Journey?

Jim was at our house when the basement concrete floor was sealed; the framers finished my healing room walls and built a knee wall in the kitchen, a fire place chase in the living room and walls in the basement; the electricians ran wiring; the ducts and ERV were installed; Josh and his crew continued with the roof; the fire place was delivered and placed in the chase; the thresholds were removed to prepare for installing the main floor radiant floor heat and 2 inch slab; Jim ordered the basement door and windows and looked for some stone for the fireplace. While all this was happening, a weeks worth of activity, I was in West Virginia on a relaxing, peaceful break – not really.

A year ago our lives changed after Jim returned home from Hero’s Journey. Just one of the results of that event was our decision to move to North Carolina. After his journey he mentioned to me that I should attend the Hero’s Journey for women. I was a bit hesitant at first because at the time I had already spent 6 years at Barbara Brennan School of Healing – an adventure in its own right, full of personal process, personal growth and discovery. What could one week in the mountains have to offer? But, after witnessing the dramatic change it made in Jim I decided to go. I made my reservation and told others about it. Many of the women I spoke with were interested and as it turned out Jane (my sister), Kelly and Theresa (two dear friends and room mates from BBSH), and Susan (a new friend I met at Esalen) decided to join in on the adventure. “ADVENTURE” does not come close to describing the experience.


You can tell by the smile on Jane’s face that we were both really excited about our week together. Little did we know what was waiting for us.


I could have never imagined how amazing, wonderful, thrilling, deep, moving, exhilarating, thought provoking, and heart filled this week would be. I laughed, cried, jumped, climbed, fell, hiked, hugged, sweated, screamed and screamed again. I comforted and was comforted. I ignited my passion and extinguished that which no longer serves me. I was buried and then sprang from the earth with much more of me than I have ever had. I drummed and drummed until the wild, happy rhythm became the pulse of my own heart.


It was a week of deep bonding with some incredible women  - all heroes - heroines in their own right.


It was also a week of feasting, not only on life but on delicious meals prepared by beautiful women with beautiful hearts.  
 
I headed out each morning with my group into an often chilly, partly cloudy, dew drenched morning.


I returned each night, my soul ignited, my passions stirred, my fears challenged and my trust in myself and more importantly in others growing and deepening.   


One day, after hours in an open field watching butterflies push their heads deep into a flower in order to reach the life giving nectar, I realized LIFE is the same. 

You can’t sit back waiting for life to give up its sweetness – you have to go for it – to take it. If there is something you want, effort has to be made to obtain it.


I also realized that just because someone is standing beside you it doesn’t mean you are standing on the same ground. We are all on different paths, different journeys; this I already knew. All those paths create different stories but underneath are the same pains. We all have different things we need to learn; but, oh, how sweet it can be when our paths cross and we journey together even for a short while. There are enormous benefits in being able to support, comfort, and celebrate with other women as we each travel our own Hero’s Journey.   

Theresa, Kelly, Jane (now known as Jana) and Me

Susan and my new friend Sue

Hero’s Journey takes place at The Mountain Institute in West Virginia. If you feel called – check them out: http://www.herosjourneyfoundation.org  


THE ERV - What the heck is an ERV?

The ERV - What the heck is an ERV?


One of the criteria for finding property was being 3000 feet above sea level so our house might be cooler in the summer months. Our chosen home site is at about 3500 feet and since we have been on site these last couple of summer months we have noticed a definite temperature difference at lower elevations. We have noted between 5 to7 degrees cooler than the posted highs for the city of Asheville. That can make a big difference when the highs are in the nineties. Our plan is to try to live and work without having an air conditioning system installed.

These are some factors that may help us with this goal.

  1. Edrianna and I have conditioned ourselves to tolerate moderate temps by having our house thermostat in Florida set at 78 degrees during the summer months. This was an idea that the government tried to mandate years ago for commercial buildings and nowadays suggests for residential users to save energy. This is a great idea and has saved us a lot of money in electric costs over the years.
  2. Our new house has good exposure for capturing outside air with large windows around the perimeter of the house.
  3. The house will be insulated to the max and have a metal roof that will reflect heat back up to the sky.
  4. Even on hot days the temperature drops to very comfortable levels at night in the mountains of North Carolina provided you have a way to exhaust the hot air that builds up in the house.

This leads us to the systems we are installing to ventilate the house. The low tech way is to open two windows on opposite sides of the house and put a fan facing outward in one of them. This creates a vacuum effect that removes the stale hot air and replaces it with cooler fresh air (provided the outside temp is lower than inside). This is quite effective and is what we did growing up in the good old days sans air conditioning. My first choice would have been a whole house fan that installs in the ceiling to exhaust air into the attic and then makes its way outside through roof soffit and ridge vents. We are going with spray foam insulation in the roof and a new trend of NO VENTS, so we can’t do this method. (I’m trying to obtain more information about the benefits and pit falls of having a vented or un-vented roof. Some say it is best and some say it isn’t. I will keep you posted.) Here are our solutions:

  1. Two highly efficient bath fans that will act as whole house fans ventilated outside using duct work. If we open a window the vacuum effect will happen to exchange air. This method will not move as much air as a large fan put will have a positive effect.
  2. We are installing an ERV which sounds like something left over from the Apollo space missions. It is an Energy Recovery Ventilation system or whole house ventilation system. This helps to exhaust stale air from the house and draw in fresh air. We plan on using this in the same way as the bath fans. I am not sure how effective this will work because they are traditionally used in conjunction with air conditioning systems. The major benefit of this devise is that it will provide fresh healthier air, eliminate odors and dilute indoor pollutants. This system works best when the windows are closed and is actually more beneficial in winter when the house is sealed up for long periods of time. The ERV also has a heat recovery system so the warm air inside will not be lost during air circulation.
Rick Cooper from Mountain Air Mechanical Contractors met with Al and I one day to walk through the house and discuss installation. Morat and Igor arrived a few days later to install the system and duct work. They also installed the duct work for all the bathroom fans and laundry room dryer.
Igor installing the ducts coming from the basement.

The ERV!


Duct work.


ERV ceiling register (vent) - sealed and ready for a pressure test.


    OH BOY, A BASEMENT!

    Oh boy, a basement!

    One thing for sure, our house is not going to move. The whole mountain is going to have to fall down first. I was excited about the prospect of having a basement so I can have a real workshop like the one I had growing up in the north. No more working in the garage and having to store my power tools to make way for the cars. In addition, the added space has room for a spare room, small bathroom and utility room big enough to house all the solar equipment, etc.

    The concrete basement slab was poured encasing radiant floor tubing for basement heating. This seems like a good time to explain radiant floor heating. Long lengths of plastic tubing are laid out in coiled patterns and concrete is poured over it. Hot water will be pumped through the tubing which transfers heat into the solid concrete which acts like a thermal mass radiating heat upward into the interior rooms.

    Our system will be heated by solar hot water panels and backed up by a LP gas boiler. Sundance Solar has designed an extremely efficient system for us that is cutting edge. It is fairly complicated and I am going to wait to get a drawing from them that will show the specifics of the design. This system will be covered in a future blog.

    The advantages of radiant heating are:

    1. Far more efficient than most other types of heat and using solar takes advantage of the ultimate renewable resource-the Sun
    2. No duct work, so no air born allergens
    3. Virtually quiet
    4. Warm floor so you can walk bare footed in the winter (Edrianna is going to love this)
    5. Humidity levels stay constant so air is not dry

    Our domestic hot water is going to be tied into this system, so we will have most of our hot water heated for free. I will also go more into depth on the entire radiant system after the main floor is installed and all the mechanical stuff is set up.

    Vernon Greene of Greene Concrete Finishers Ent. LLC from Swannanoa (the mountain range we are building on) visits and discusses our concrete job with Al.

    Floor Prep!
    Before the concrete can be poured the plumbers have to lay the basement plumbing (future blog), a crew has to level the gravel sub base, put down plastic, 2" thick foam board insulation, wire mesh, and then the radiant heat tubes. 

    Vernon's crew: Joaquin, Mario and Pablo work on installing the foam insulation.
    Joaquin (on left) and Pablo put in the wire mesh. A PINK basement - but not for long.
    Next, Jim lays out the walls for the utility room, bed room and bath. The radiant tubes have to go around the walls so we don't risk puncturing one of the tubes with a nail when the walls are installed.

    Grey, from Sundance, spends a good bit of time calculating the layout of the tubing before he begins. He said they try to get 200' in a run (250' takes too long to warm up and cools quickly and 100' warms up fast but isn't as efficient).
    Curtis and Grey alternate placing and tie wrapping the tubing to the wire mesh.

    After all the tubing in laid out, the entire line is pressure tested.

    Joaquin and Pablo return to place a trim piece of foam insulation around the perimeter of the room. The concrete will be poured to the top of the foam. It also creates an expansion area for the concrete and prevents it from pouring into the bottom of the Superior Walls.

    The first two trucks of concrete arrive plus the pump truck. The basement needed almost 4 truck loads at 15 yards each. There were so many people I started to lose track of everyone. Two truck drivers, maybe two operating the pump, Lonnie and Randy laying out the hose and  spreading the concrete, and at least 4 smoothing it out: BB, Chin, Joaquin and Pablo (I may have missed someone).  

    The first blob of concrete goes in - it is a lot thicker than I imagined it would be. The crews begin working it right away.

    Lonnie and Randy take turns spreading the concrete while the rest of the crew smooths it out.


    After the trucks and the rest of the crews left, BB and Chin stay to finish the job. They spent hours with the big fan looking thing, changing it's blades - for different effects, and sprinkling the floor with water to repair bumps and dips.
    After they were done they had several hours to kill while they waited for their ride. We chatted with them for a long time. Eventually we all ended up inside the house and BB fell asleep on the floor of our bedroom. It was a long, hot day. We are glad he found a place to rest.

    The next day they cut expansion joints to prevent the slab from cracking. The following Monday the floor was sealed with a water based sealer to prevent stains.  

    By the way, since I wrote this piece last week, the eastern seaboard including North Carolina experienced an earthquake, Freaky! The house did not slide off the mountain.

    VISITORS

    Visitors!

    When we decided to purchase this property, Tom (Jim’s brother) and Kathy, came for a visit to check it out. Tom helped us make a decision as to where we would place the house. On their first visit we went to the west side of our property by truck. On their next visit we hiked down past the creek and back up to the west side (sorry, didn’t have the camera that day). Until a few weeks ago they were the only family or friends who had seen our site.

    Recently, our friends Brady & Sandy Myers stopped in for a visit with their daughter Kaylee and 3 rescued bull dogs. This time I had my camera!
    Brady & Kalyee at Turtle Rock (the new name for our motor home area)

    Sandy, Kaylee and... this is either Harley, Rosie or the other one (sorry!)

    Kaylee and Rosie (I'm pretty sure that is Rosie - the young one and newest member of the family).


    At the end of the week my sister, Jane, came for a visit.  She and I headed to West Virginia to attend Hero's Journey - a week long retreat - and she will be back for a week long visit at the end of this month.  

    
    Jane at our property and getting a tour.


    Sunday, August 7, 2011

    I LOVE IT WHEN A PLAN COMES TOGETHER

    I Love It When A Plan Comes Together

    Every corner of our floor plan has been etched in my mind having been seeing and working with it everyday since its inception back in January. It went through several generations of changes and adjustments to suit our needs and site requirements. Building the scale model and drawing 3D renderings helped us visualize the spaces more fully. Last week the framing for these interior spaces went up and for the first time we got to see what we created for real. Very exciting!

    Finalized floor plan prior to construction

    My latest sketch showing our color scheme


    After the main house shell was weather proofed and second layer of sub floor plywood was laid, Jim B., our framer, reviewed the layout with us and began marking the walls on the floor with pencil and chalk line. We only had to make a few minor adjustments to some of the wall positions because the working drawings don’t always jive with what actually gets built.

    Our plan also had specific design elements that were not included in Deltec’s working drawing set, so I drafted up additional floor plan, sections and elevations to aid the crew. Funny thing is the scale model ended up being the best tool for Jim B. to understand what I wanted built. He made a comment to Al, our contractor, that he would like a model for every project in the future. That’s a great compliment for us. Deltec expressed an interest as well in our model a couple of months ago. I see a future endeavor there.

    A side note: It is tough for me to release control and my paranoia that things won’t get built correctly, so I have a tendency to hover, but I am trying to trust that it will be done right. In my defense this comes from past experience back in Florida while building Edrianna’s room addition. I was on site there and several times when I was not supervising strange things happened. I won’t go into what they were; however, they were the kind of things that make you give one of those dog like head tilt moves while wondering “what the heck is that”. The result was things had to be fixed or redone.
    Al can not be on site at all times to supervise, so being there personally as a second pair of eyes has been helpful. Anyway, my point is it is good to be on site if something gets accidentally missed or if questions come up, especially since some decisions are made in the moment.

    Jim and Harry lay out the walls

    The first wall is the entrance to our bedroom. The connection at the top - because the walls didn't line up with the trusses - is called "dead wood."


    Because of the configuration of the trusses the ceiling in the kitchen forms an arch rather than coming to a point which I thought would happen. The arch is a nice surprise.

    This is the finished arch - the back wall of the kitchen

    Jerry, a full time fire fighter, joins Jim's crew on his days off. He is working on Edrianna's healing room.

    Jerry begins forming the glass opening above the wall between the living area and Edrianna's healing room. We created this to allow for more light penetration between the two rooms. We haven't decided how it will be finished but we have been looking at a lot of options.


    This is the wall that is between the living area and Jim's office. It is an open wall that steps from 4' 6" to 7'. This allows for a feeling of openness for light and air circulation. It will come in handy in the winter because the heat from the wood stove will easily work its way back through my office and into the master bedroom.

    Over the past few days Mitchel has been working on adding connecting plates to all 15 interior corners of our house. You can see two of them in this photo. There are actually 3 per corner. One at the base of the header, one at mid height, and one at the bottom of the wall.

    On Friday afternoon Jim Burleson commented that this is the strongest build home he has ever worked on.


    Edrianna took this photo of our model inside our house. We made the model to check how light would penetrate the windows.


    Even though we are in a different season and the sun's angle has changed, the sun still comes through the windows pretty much the way we anticipated.

    I love it when a plan comes together!

    For those who liked watching THE A TEAM...
    "I pity the fool who doesn't think this house is cool!"


    READY TO HIT THE DANCE FLOOR

    READY TO HIT THE DANCE FLOOR!

    We have been joking with everyone that our huge open house looks like a dance floor. The second layer of plywood went down and we started getting the urge to boogie - especially since Jim B. started cranking up the tunes from his truck.

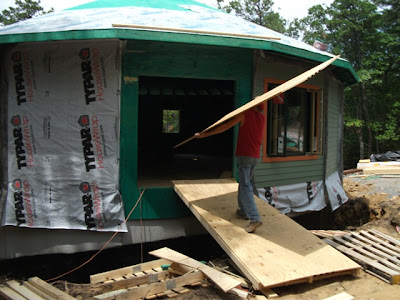
    The new ramp makes it a lot safer and easier for Mitchell to carry the plywood for the floor into our house.

    Jim B. has some help as he marks the floor with chalk lines where the floor trusses lie beneath. This way they are sure they are nailing the plywood into the trusses. I thought this was pretty cool.
    The clip in the middle of the photo is actually a spacer that is place between the plywood on the roof so it has room to expand and contract. It just happened to be there when I took the photo so I decided to tell you about it.

    The second layer of plywood goes in really fast now that they can power their nail guns. 
    Before the power came on the crew was using a Honda generator for their power saw - when cuts had to be made.The generator was so quiet I didn't even notice it until someone mentioned it.

    The floor is finished so Jim and Harry start laying out the walls.

    No stopping to dance on the new floor, but believe me, we are DANCING!