 |
| As I mentioned in an earlier blog we intended on putting in a deck under the picture windows but wanted to build it ourselves. We had our builder put in a Ledger Board just below the house siding (green HardiePlank) because they were bolted through the Superior Walls and the bolts were covered up with insulation and drywall on the inside of the basement. It would have been a mess to do that after the basement was finished - which was in November of 2011. |
 |
| On February 4th 2014 Jim started seriously thinking about building the deck and getting it done by the end of the year. The deck will step down from the existing deck at the front door and the rail from the post to the house will be removed. |
 |
| March 15th Jim began laying out the deck and calculating it's shape and angles. Since our house has 15 sides (no 90 degree angles) it was pretty interesting to calculate. |
 |
| March 31st Jim had to add some Wedge Bolts because the building code changed and the distance between the existing bolts was not enough for a 120 mph wind. Yep, we do get some pretty good winds up here on the mountain and hope we never see 120 mph but our deck will hold up if we do. The Wedge Bolts go through the Superior Wall and into the area that is insulated on the inside of the house but not through the drywall. |
 |
| July 4th at 10:30 am Jim started construction. |
 |
| Same day by 12:45 things were looking really good. Phase One of Jim's plan is completed. |
 |
| July 5th at 3:30 Phase Two is accomplished. |
 |
| But what are those posts sticking up through the middle and on the sides of the deck? And what about any footers for the posts to hold up the deck? Did we already do the footers and you missed that part? NO! |
Let's review. Our house has some funky angles - no right angle turns
that a typical house would have. Jim decided he would actually have to build the frame of the deck first so he could position the footers
exactly where needed. Because of the slope of the yard he also couldn't
just lay it all out and mark the locations for the footers. He was also dealing with a plumbing waste pipe that he wanted to avoid making the placement of the footers critical.

Jim decided the way he would address all these issues would be by building "jacks" that would hold up the frame of the deck and then we would mark the placement of the footers. In theory it sounds pretty good right? Well, not to me - I thought he was crazy. I kept asking him; "Tell me again how you are going to build this deck." The actual process changed slightly each time he told me but the basic idea stayed the same; "With Jacks." The jacks are the vertical posts built of 2 2x4s with spacers between them providing a support for the deck Girders (2"x12"). The Jacks have a 12"x12"x2" plate at the bottom that rests on the ground...the sloping ground!
 |
| A view from inside the house looking down on Jim and the Girder and Jack instillation. |
Let's go back to the photo where he is sitting on one of the Joists (2"x8"). The structure was solid. I never believed it would work; but, he did it. It was a brilliant plan. I've always said he was a F---'in genius.
By the 6th of July he was ready to mark the location of the Footers and begin digging. Before he began I headed out side and picked some Daisies and Queen Ann's Lace that were about to bet trampled.
 |
| The Plumb Bob was a good investment.We used it to mark the placement of the posts and where we would need to dig the holes for the Footers. |
Jim cut a small piece of wood and attached it to the top of the Girder, then cut a very small notch in it to hold the Plumb Bob string. This way he was able to position it exactly over the spot where the center of the post would eventually be positioned and locate the center of the space we needed to dig out for the Footer. It worked great. You can see the small plate to my left and in two of the next 3 photos.
By the middle of August things were going great digging the holes for the footers until Jim hit ROCK. It wasn't much of a surprise since we live on a mountain and noticed early on that we couldn't put a shovel in the ground with out hitting rock. On August 15th Jim rented what we would call a jack hammer but at the rental place was called a pneumatic breaker or electric breaker. It took a whole day but worked like a charm. Before 5 pm all the holes were dug and frames were made for the footers. All total it took 4 days of hard work.
 |
| Six holes at 28" x 28" x 18" deep. |
 |
| Big enough to sit in! |
|
|
 |
| But after all that hard work the hammock was much more comfortable. |
|
|
|
|
|
|
|
|
While digging the holes I came upon this impressive worm. It was huge. I relocated it to my raised garden bed.
Next on the project list...concrete!
 |
| Jim loaded onto our truck, unloaded at home and then moved so he could use them at least 80 bags of concrete. He started with the 80 lb bags but switched to 60 lb bags. They were the same price per volume and a lot easier to work with. |
Before we could fill the frames with concrete we had to add Rebar (for stability) and mark a "fill" line on the frame so we would know how much concrete to add. And, not to mention, get the footers inspected by the building department. Not everyone posts a permit for a deck but we wanted ours to be permitted. One reason, there might be some important codes we need to know so that the deck will hold up for as long as possible, and if we ever sell the house and the deck wasn't permitted then we would have to pay a fine.
 |
| Rebar and the fill line. |
 |
| The building code called for only 3 #4 rebar. We actually did 6 because it added more support, didn't cost much more and because of how we put them in it helped them stay stable while we added the concrete. |
Jim was really worried about passing inspection with the building department because they had told him one thing in terms of engineering, then changed it. We had heard lots of horror stories about inspections and after our experience with building the house, we knew you just can't anticipate the type of inspector you will get. We knew we had done everything we could do correctly - even beyond, so we just kept a positive outlook and called for the inspection. The inspector arrived, a very friendly and talkative guy. He went on for 45 minutes about all sorts of things. We listened patiently and kept our positive attitude. He was very knowledgeable and gave Jim lots of tip on detail work for the deck. He got out a metal probe and stuck it into a few of the holes and that was it. He was done and WE PASSED! This was the initial inspection and was only for the footers. I was amazed he didn't say anything about the framing work we had already done. We only have one more inspection and that will be after the deck is completed.

Now we have to fill the 6 holes with concrete.
On August 25th we started mixing concrete. Each bag of concrete had a suggested amount of water to create a specific (tooth paste) consistency. We found it was easy to mark a water jug and fill it just a little beyond. We would use slightly less, which meant we were using what they recommended, and by leaving a bit in the jug we had it in case the mix was too dry. After the first few bags we realized that we always needed a bit more and eventually got the right mix each time. Jim found that mixing it with his hands was easiest. Heavy Duty Gloves are a must! He would pause on occasion and I'd scrape the sides with a trowel.
 |
| Each hole averaged between 12 - 14 bags of concrete. Jim hauled and mixed about 78 - 80 bags of concrete. We got a pretty good system going and filled the holes pretty quickly. I used a small garden trowel to move the concrete around in the hole and then the edge of a level to flatten and level. Note the ladder... The ground was pretty slopped so Jim used the ladder to create as level a space as possible so the concrete and water would stay in the tub till we were ready to "pour" it out. |
This is a J Bolt. It had to go into each Footer because it would become a part of a bracket that would eventually hold the posts for the deck. The pendulum came in handy again so we could get the J Bolt exactly where we needed it. After the concrete was in the Bolt had to go in pretty quickly, before the concrete could set up. It was tough enough to get the J Bolt in immediately after the concrete was ready, we certainly could not have waited.
Sometimes Jim had to mess with it a bit to get it just right and not too deep. There are threads on the end of the J bolt that need to be exposed. Once we had the height and position (using the pendulum) we checked to make sure the Post Bracket fit perfectly.
We placed the large part of the Post Bracket on the concrete (it didn't sink) and attach the washer and nut to the J Bolt to make sure enough threads on the bolt would catch and the bracket sat relatively straight. When we were convinced that all was ok we removed the Post Bracket and waited for the concrete to dry. which actually meant we started mixing the 1st of the next 12 - 14 bags of concrete for the next Footer. By August 28th the last footer was in.


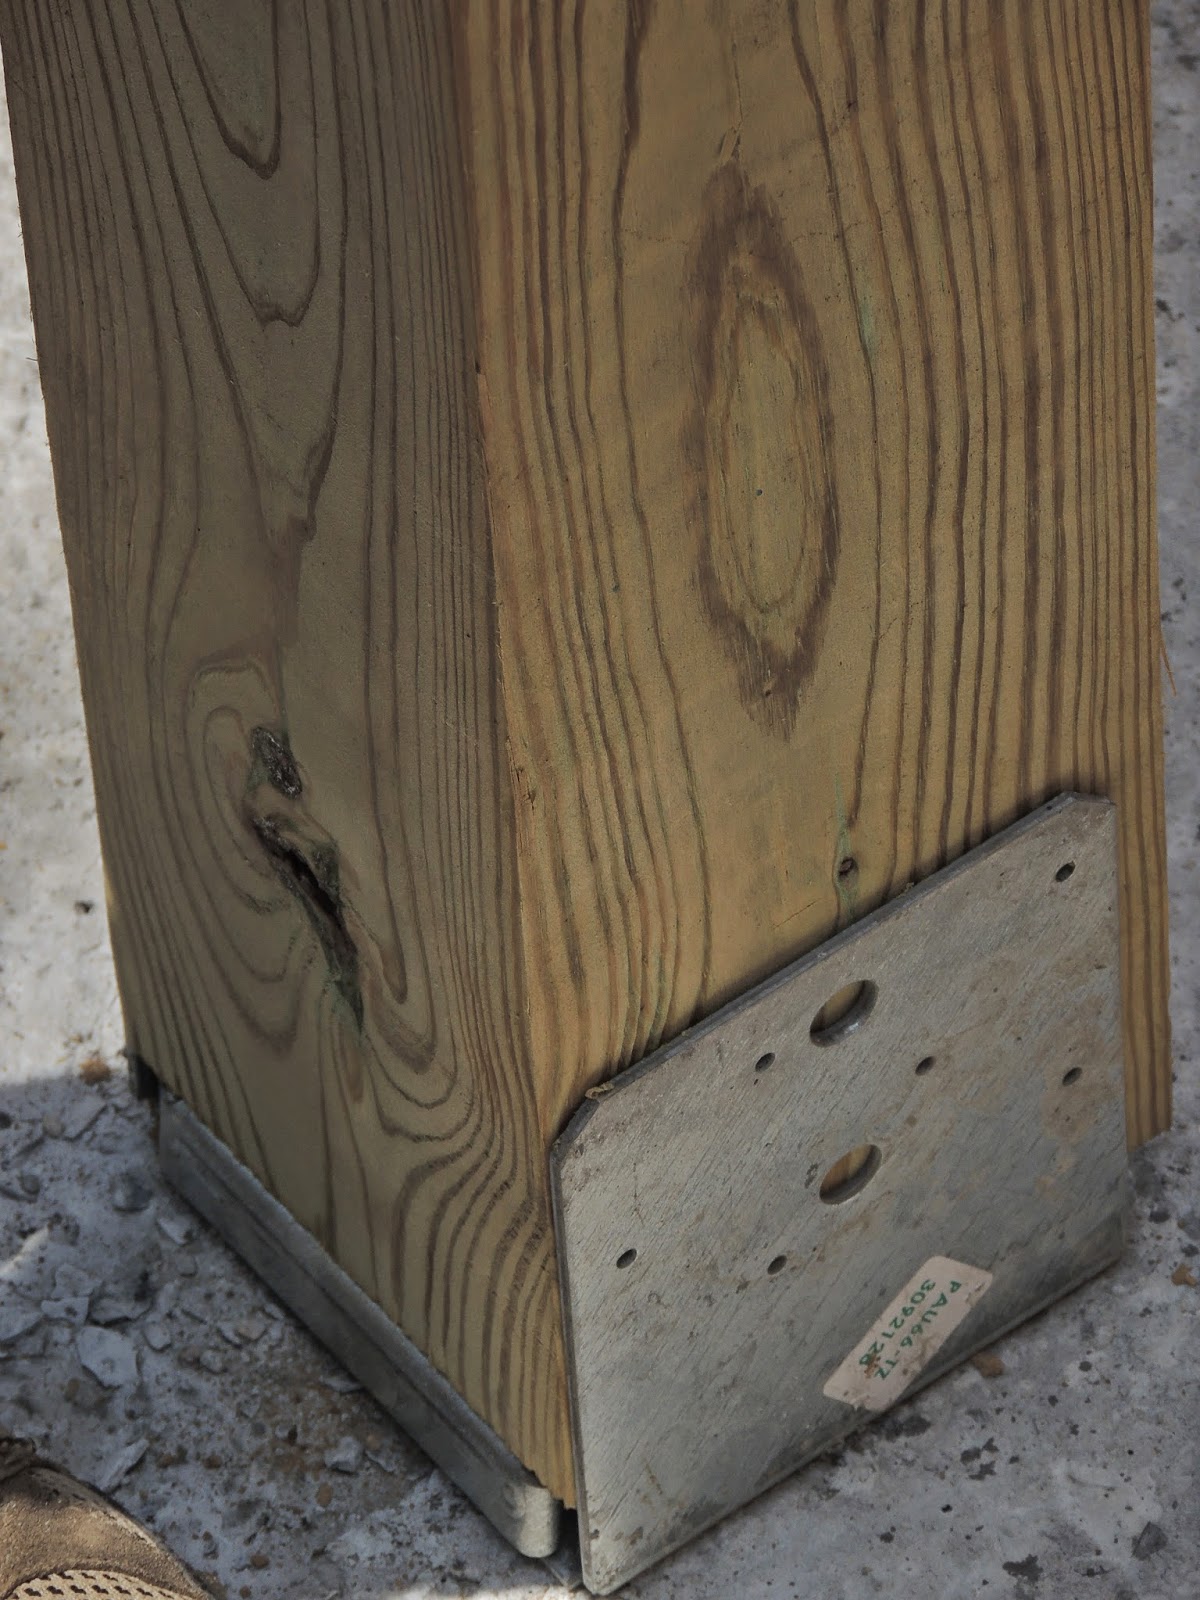
After the concrete was dry we put the Post Bracket back on. These Post Brackets are adjustable, meaning you can shift them slightly one direction or another in case you need to move them around a bit. Why would you need to do that. Well, remember that Jim had already built the frame of the deck. The posts needed to be in specific places or they would be too close or too far away from the deck. We used the pendulum one last time to make sure the Post Brackets were exactly where they needed to be in relation to the deck so when the posts were added they would be positioned against the Girders. Once positioned we tightened them, being careful not to tighten too much so we didn't break the bolt.
 |
| |
By August 29th the concrete work was done and we removed the plywood frames. It was pretty easy to do because Jim used Pneumatic Staples and a Staple Gun to make the frames, with the intention that he would want them to come apart easily. It worked perfectly. A few good kicks and the crow bar and hammer made the removal job easy.

NEXT: Posts
We used 6" x 6" posts. Each was placed on top of the Post Bracket and eventually bolted into place.
Some posts were much longer than others. The tallest was about 12 feet. These are my "I can do it" pictures. Hoisting it up this way made it pretty easy.
On August 30th all the posts were in place and Jim put in some temporary screws. The bolts will go in after we get the outside girder positioned. The jacks that Jim made earlier are still holding up the deck.
BRACING: September 1, 2014
Bracing of the posts came next using 4" x 4"s. Bracing is for stability and to prevent side to side sway. Because of the height of our deck and for our area in western North Carolina we had to add bracing. It is easier to see now that the posts and bracing are in how the inside and outside girders will be on either side of the posts and enclose them. This was one option in building the deck and obviously the one we selected. There were others but Jim preferred this one.
The building code was also specific about the angle of the bracing. It had to be between 45 and 60 degrees. Jim made ours 60.
We bolted the bracing into the inside girder with 2 5/8 inch bolts per 4" x 4", which will be hidden when the outside girder goes on.
 |
| Just had to add this photo of what we have come to call the "Bad Ass Bee". Jim was unfortunate to have been stung by one of these guys. It is a sting that lasts for days. So far I've been lucky, but did get a smaller bee in overalls one day when I was picking green beans. I've never taken my clothes off so fast in my life. |
Back to Bracing...
A bolt also went through the bracing and into the post. That was a bear to drill. First Jim used a hole drill to create a horizontal space for the bolt.
Then he switched to the drill bit and went all the way through the bracing, the post and sometimes through the next bracing. Between the two of us we were able to keep the hole pretty straight.
 |
| The reason we recessed the bolt was so that it wouldn't be sticking out on the sides of the bracing and to make sure the nut laid flat. |
Note for yourself for future projects...you can either purchase several drill bits and take forever to drill a few holes or you can fork out the money and buy a really good drill bit and have the job done in a flash. Trust me, spending the extra dollars are totally worth it. This thing cut through like a hot knife through butter.
By mid September and after a short break to visit relatives we were back at it. You can see in this photo that the outside girders are on and we are adding 2" x 8"s placed between 1 foot to 1'-6" on center, depending on the angle. The reason we did that was not only for the building code but because we were taking into consideration the boards that would be placed on top of the framing and needing to have support under them.
 |
| Sometimes the angles were a bit tricky! |
 |
| Measure twice and cut once! |
We added bracing between all the 2" x 8"s. We used a nail gun on those - what a fun tool! Each 2x8 also had joist hangers that held it in place. You can see a few in this photo to the right of Jim. We used Strong Tie galvanized structural screws as suggested by the manufacturer. All the nails we used were galvanized as well.
We made sure the bracing boards between the 2x8s were square by using the Speed Square, or better known to me as the Little Quickie Square, since we had a few sizes and I sometimes liked making up tool names if I wasn't sure what one was called. Nail Gun! I could remember that one!!
 |
| Another visitor to our job site. |
|
|
 |
| This is a nifty little tool we used a lot. I called it the knuckle buster for a while because that it what happened till we got the hang of it. It was great for getting into tight angles with the drill, which we had a lot of. |
 |
| With all the posts secure and the bracing in we removed all the jacks. |
 |
| We used some plywood and extra deck boards from the original decks and placed them on the framing so we could create a safe work surface when the deck boards arrived. |
 |
| It is now September 28, 2014, leaves are starting to change and we are getting excited about our view from the deck. |
 |
| I had been wanting to remove this rail since we decided to build the deck addition. |
 |
| Jim gave me the go ahead and I ripped the sucker out! |
 |
| The screw head broke so I had to find a tool to remove this screw from the post. Note that it says Made in England, not China or Japan. Now that's pretty cool, plus it worked great! |
September 28th and the deck boards still haven't arrived so Jim decided to go ahead and make the frame for the step between the original deck and the new one.
 |
| A view from almost the corner of the deck back to the original deck and the front door of our house. |
DECKING:

October 6th - the deck boards arrive. This was one of the craziest things we have ever done, and the list of crazy things is pretty long. Jim purchased a rack for the truck to carry long loads, like deck boards. The rack had a weight limit and we quickly reached it as we piled on the boards at the lumber yard. We redid everything and loaded the bed of the truck. All the boards were bending and looking like they would snap any second. There was a guy sitting in his truck getting a good chuckle watching us. Someone finally suggested we use the wood frame that the boards came on. That made sense so we unloaded everything and started again. One of the guys from the lumberyard hung out to help us and we were so grateful. Jim offered him and tip and he seemed excited about it, after all his hard work. The crazy part continued with the drive home. We went really slow, with one eye on the boards the whole way. The final road to our house is pretty steep and has a lot of hairpin turns, maybe 8 or 9. I was worried that everything would slide out of the truck just because of the angle of the incline. On most of the turns the bottom boards were scraping the road. On the next to last turn one of the boards slid out - only one. We were so blessed to have made it home safely.
Now we had to get the boards from here....
to here..... We celebrated when this task was done.
In selecting our decking we went with a composite material, the same as our original deck. They
aren't quite as "green" in terms of manufacturing as I had liked but no
trees were killed and they will "never" have to be replaced because of
rot.
 |
| October 8th the first deck board goes in. |
 |
| We used a CAMO. It is a super cool tool that made installation fast and easy. |
 |
| It makes a hole in the side of the board instead of the top so you aren't ever stepping on screw heads and don't have to worry about recessing to the same depth. The Camo does it automatically. |
 |
| The deck boards went in quickly. Jim decided it was break time and brought in our deck chairs. |
 |
| October 8th by 3:30 we were done for the day and enjoying our deck. |
The next day we started putting the the boards against the house. This cool angle thing worked great. It is actually a tool he used for drafting years ago and hung on to it. It allows you to transfer parallel lines from one place to another.
 |
| We also used this..."the clear angle thing" for some of the tricky spots. |
 |
| We wanted to have a nice even fit around the corner trim on the house. |
 |
| The Jig Saw, also known as a Skill Saw, helped us make some precision cuts. |
 |
| Perfect! |
 |
| We sanded off the rough edges after making cuts. |
 |
| We had to add some bracing boards so we would have a place to attach the deck boards. You can see the "knuckle buster" on the deck to the left in the picture. |
 |
| We couldn't always use the CAMO close to the house because the drill wouldn't fit. When this happened we put the screws straight into the deck boards. |
 |
| The deck boards went really quickly. |
 |
| We had to use a Bow Wrench on some of the boards so that we could nudge them into place. |
 |
| It is looking really good. |
 |
| Not much left. |
 |
| Trimming the ends off. |
 |
| Looking really good! |
October 17, 2014 - our first dinner on our deck. Still need the rail and step and finishing the trim around the edges, but we are so close.
 |
| Next day - working on the step. |
 |
| Step completed! |
 |
| Sunset from the deck. |
 |
| Another visitor! |
DECK RAIL:
 |
| November 4, 2014 the deck rail arrived. |
|
|
|


Jim started installing the posts as soon as he could and soon discovered that the company forgot to send the corner post.
 |
| It took about 3 weeks to get the new post and while we were waiting a Bob Cat visited. |
 |
| And then this little hawk. I think it was checking out the label on the deck board. |
 |
| By December 4th all the posts were installed. He really wanted to finish his project by the end of the year. |
 |
| A center bar and bottom rail had to be installed. |
 |
| Each wire had to be threaded through the bars. |
 |
| At the beginning end the cable fastened with a nut. |
 |
| On the other end the cable goes through a locking device so the cable can be pulled tight. |
 |
| Once the cable is pulled tight it is tightened on the beginning end with a wrench. |
December 5th, 2014 - the deck rail looks amazing! We are so happy with it and glad we decided to go with a cable rail. You can tell how much view would be cut off if we had gone with a traditional rail.
Some time between Christmas and New Years while Jim was working on the deck he fell off one of the ladders and bruised his ribs badly. He is so close to being finished with the deck we decided to go ahead and post this blog anyway. He only has one day of trim work and then we will call for the final inspection. Looking forward to that day.
I realized I only had one side view photo and the rail wasn't up yet. Here is a photo taken on February 24th, two days before we got about 6" of new snow.
I really love the rail we picked. And Jim is doing a nice job with finishing off the edge of the deck.
I'm still catching up on some things that were going on in the fall of 2014 - like harvests from our garden and making soap. I hope to get those done soon.


 I really love the rail we picked. And Jim is doing a nice job with finishing off the edge of the deck.