Sunday, July 31, 2011

HERE'S THE WALLS, YA'LL

Here’s The Walls, Ya’ll

Friday, just before 11am, our framing crew started un-stacking the pre-built wall panels and lifting them, one by one, into place around the perimeter of the floor. Again the crane came in handy because each panel weighs between 300 and 800 pounds depending on if it includes windows and siding. Can you imagine having to lift these by hand and maneuver up a skinny ramp and balancing them on the outer edge of the floor while trying to level and secure them in place? Even with all our man power, that would have been tough and dangerous.

Panel “A”, our front door, went first and the crew took a lunch break. After lunch they pushed through for about 2 hours installing the remaining 14 panels. Many of our blogs take longer to write and edit than the assembly jobs have taken. The crew really busted there behinds getting the floor and walls up in just two days. They just came off another job site and they worked hard in the summer sun.


The Incredible Hulk showed up to help finish the job.
Actually the non-toxic wood surface treatment has a tendency to rub off on sweaty hands.
We were hoping our "green" philosophy would rub off on others, but this is a little ridiculous.


WE WERE FLOORED - part 2

Oops, it posted before I was ready. Bad Google, bad google!
So let's continue...
Here is the fast version of the plywood and ribbon boards.

The earlier bracing is removed and replaced with ribbon board at the top and bottom of the trusses.

Jim and Al mark the floor to ensure proper placement of the walls (a, b, c...). "A" is the front door.

            Straps - called bridging - are installed on each truss, connecting each to the other and helping stabilize the floor.


Hips & Jacks
There are 15 hip floor trusses - the longest in the middle, 15 intermediate hip trusses, and 30 jacks.

A view of the floor trusses from below. The basement feels really huge.

Each sheet of plywood is fastened to the floor trusses with PL 400 Sub Floor Adhesive and nailed.

Almost done.

One small ring of plywood and a center plate remain. But this is where they stopped for the day so they could install the walls. (see next blog post)


WE WERE FLOORED!

We Were Floored!
Way back on February 28th when we signed the contract to have our home built and delivered by the end of July, that date looked a long way away. Well, here we are and the home and almost all its many pieces showed up today (July 28th). Our framing crew rolled in at 7 am and assembled the floor system between unloading the delivery trailers. We got up at 5 am to make our 1 ¾ hour trek from Franklin, stopping for donuts on the way. The weather gods shown on us favorably with sunny skies.

We were very pleased to see the project start on time, even a little ahead of schedule because normally delivery and unloading is done all at once from one big truck and we had smaller loads brought in by trailer due to site access difficulties.  A special thanks to Al, our contractor for putting everything in place to meet our delivery deadline. He had less than 5 weeks to organize the build due to our 2 month closing delay.

I actually sat back and watched the work proceed; even though there was a strong temptation to jump in and help. I hate being idle while others labor. However, I did help with a couple of building panels as the crane lowered them to the ground for temporary storage. Edrianna kept busy photo documenting the eventful day.

On Friday morning the crew finished with the floor and just prior to lunch and then started assembling the wall panels (see next blog). The last two trailer loads of parts showed up as well.

Here is the fast version of the floor trusses going in.
More details, extra photos and commentary provided below.


Here is an update for you “Bears” fans. Our resident Ursa Major or who we have named until we can determine the gender, Buddy Bear, has shown up twice this week. Once while our carpenters were eating lunch and the next day around 7 am below the house on the edge of the woods. Buddy does not seem to be put off by the construction noise and I’m sure he will be a regular fixture as soon as it really quiets down. Please do not let this be a reason not to come and visit us in the future. We will supply all visitors with a bear proofing kit which consists of an open can of tuna, a “Mr. Ranger Sir” cap and a jar of honey. Or for the squeamish: bear spray, whistle and a very long stick. We are looking for a volunteer to get close to Buddy to verify its sex. Good luck with that!


All kidding aside - we are taking the Bear thing seriously (Edrianna made me add this).

The crane opperator, Bobby, also arrived with doughnuts and watermellon for an afternoon snack - very appreciated by the crew on a hot summer day.

The crew (Jim, Alan, Johnny, Harry, Jerry and Mitchell) install the center post that will support the floor trusses.
Rebar for the post footer was laid earlier in the week, inspected, and then the concrete was poured.
A lot of work went into making sure it was level and at the exact elevation with the walls. You may remember the Bench Mark being mentioned when the house was laid out. It was set in concrete before the Superior Walls arrived and the pole bolts into it.
  
Al, our Builder on the left, and Boyd, the driver from Deltec discussig the next delivery loads.

This load consists of floor trusses and the first layer of 5/8" plywood. It is all green because it is coated. Jim mentioned this in an earlier blog.

 All the trusses in place with bracing and top ribbon board.


Danny and Jim looking very serious.

Boyd brings load 2 from Deltec - 10 of our 15 walls.


Wednesday, July 27, 2011

OH WELL part 3 - and other things related to water

OH WELL part 3 & other things related to water
We had a nice 505’ deep hole in the ground full of water, so the next thing we needed was a way to get the water out of the hole. Greene Bros. came back with a new crew (Justin and Jerrel) and they put in the pump. This machine wasn’t any were near as noisy as the drilling (ear plugs were a requirement for the last one) and it didn’t take as long, they were done in one afternoon.


As you can see a much smaller truck than the first one.
On the first try the truck wasn't level.


Jerrel dug a hole for the tire to help level off the truck - that worked like a charm!


The goal was to place the long and skinny pump 20’ from the bottom of the well. The electrical wires for the pump were attached and taped (I wonder how long the tape lasts) to each 20’ length of PVC. The bottom half of the pump contains the electronics, the center is the intake - screened to keep out debris, and the top houses the impellers which drive the water up the pipe.


The PVC pipes were connected one to another and finished with taped.
Note the 500' spool of wire - that will soon disappear.


And see all the pipes lying on the ground in the distance - they disappear quickly as well.


Twenty-four pipes later the last one is attached to the lid.
I'm sure it has an official name but I don't know what it is. 
Oh, and the spool of wire is just about empty!!


A “pig tail” was added after the crane lowers it into place. I mistakenly called it a “pony tail” – it of course is different no matter if you are referring to the well pump electrical system or hair style. The“pig tail” is hooked up to the electrical from the house and splits to supply us with an outlet for the motor home.


So here it is, our first and hopefully last well - may it serve us "well." Justin and Jerrel kept calling it "temporary" and I have no idea why. I hope it isn't an omen and only means it isn't quite done and just needs the finishing touches - like power, and a some pipes to get the water to the house, and a spigot so we can use the water at the well - things like that!


WATERPROOFING

The county required extra waterproofing even though the Superior Walls are already waterproof.


Richard, Jose and Augustine arrived from Building Environmental Solutions www.gotobes.com  to put spray waterproofing on the areas of the Superior Walls that will be underground.


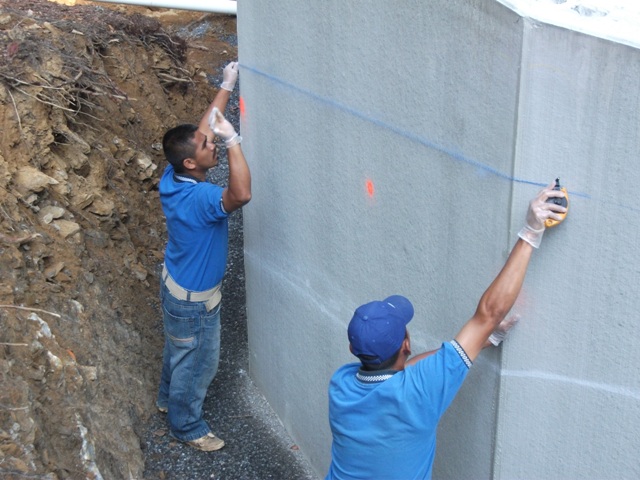
First they mark the wall. As you can tell by the number of marks on the wall it took a little while to settle on the height. The final decision was based on the fact that the dirt has to slope away from the house so rain runoff doesn’t flow toward the house.

Waterproofing is spread on all the corners before it is sprayed for extra protection.


The spray is combined with calcium carbonate so that it will be dry to the touch quickly after it is sprayed.


It only took Jose and Augustine about 30 minutes to complete the job. They like doing Superior Walls because they are already smooth and clean, no scraping and cleaning as with typical concrete, block or what ever they are spraying. They spray rock, pipes, and all sorts of stuff.


INSIDE PLUMBING – basement level
The ground floor plumbing went quickly as well. Mark and Greg of TP Howard’s Plumbing Co., Inc. www.tphowardsplumbing.com laid out the lines. The basement utility room gets a drain in the floor and the basement is also plumbed for a future bathroom. All that connects to the waste pipe that will be descending from the main floor above. Everything eventually connects to the waste line that leads to the septic tank and then drain field.


Mark and Greg arrived again the next morning. The pressure test passed – they checked the pipes for leaks – none, yea. The job was finished and ready for the inspector.


The inspector arrived that afternoon and we passed – yea again! 


WATER WORLD

Jim: When I moved up here in early spring my brother Tom mentioned to me that we ought to go white water rafting some time. So...for his birthday I gave him a gift of white water rafting. I was able to work our trip into a day when we were not busy with the house. I asked my brother in-law, Jay, to come along because I thought it would be a fun guy's day out - especially since we are much closer  where he lives.


I'm out front, Tom is behind me to my right and Jay to my left. They left it up to me so I signed us up for section 4 of the Chatooga River (the most extreme rafting available in this area). The movie Deliverance was filmed on this river. We went through areas with names like Seven Foot Falls (photo above), and Decapitation Rock. On this run we were the 4th raft through and the first 3 flipped.We made a pact that we would stay in the boat and we did for the entire trip.
We are dudes in our 50's and we got skills!


Whoo Rah!

Jay, Tom, Jim
A good adrenline rush every now and then will keep you young.
Our next trip will probably be rock climbing.


Jim: I carved this from and old stump I found in Tom and Kathy's woods then I wood burned in our name. It is now at our new house and pointing the way for visitors.


Saturday, July 23, 2011

Superior Walls

Superior Walls

 Our basement foundation was delivered to the site and erected in about half a day.  Amazing! Traditional foundations are usually constructed using poured concrete with wood forms or concrete block walls. This system, like our Deltec house, is done in a factory with the latest technology. This is a fascinating system for several reasons:

  1. There is no waste or debris on the job site.
  2. There is a permanent barrier against sidewall water penetration.
  3. Built in insulation which is superior to other materials.
  4. Inside walls are ready to finish: electrical, plumbing and drywall, and more insulation if desired but it is insulated enough on its own.
  5. Since we are working with a 15 sided structure the foundation is more precise (extremely important).
This graphic is the property of Superior Walls.
We included it here to show the details. (click to enlarge)

A key to making the installation go smoothly is the level gravel base. Ted Inman our grading expert from Cold Mountain Siteworks did an excellent job making the area perfectly level and the Superior crew was very impressed.

Here is the fast version of how it all came together.


If you couldn't open the video here are the highlights.

The perimeter it tamped down and checked to be sure it is level using a transit.
The transit is so cool. A laser beam sweeps the area (the three legged thing in the distance) and someone holds a pole that beeps according to how close you are to being level. A solid beep indicates dead level but fast or slow beeps mean you are off.


All measurements spring from the "bench mark" - the center point of the house (far left). Every wall is roughly laid out and a long bolt is placed to mark each corner. After the first time around they were only 2 inches off. 
One of the walls on the north side of the house runs east/west. Jim let the crew know which wall to start with so the whole house will end up being on its proper orientation for passive solar and view. 

After the rough measurements, the crew position two angled rebar stakes per wall and recheck the level again.


One of the crew rakes the gravel to fill in any gaps between the rebar.


They use a flat beam for final smoothing of the gravel.


Once everything is perfectly level the rebars are removed.
Now they are ready for the walls.
This whole process only took about an hour. Even with all the leveling they did, the crew said it could take several additional hours if the gravel isn't ready.

The crane arrives. This one is nicknamed TONKA because it is a small one. You an tell how much our property slopes by how much leveling had to be done to get the crane stable.

The walls arrive on three truck loads and one by one are hoisted by the crane.


The first wall is positioned, the angle is checked, and it is secured with a stabilizing pole.


As each wall is added its position is adjusted for accuracy. An adhesive caulk is applied to the edges where the walls come together.

The walls are bolted together top and bottom.

Caulk is added to the outside and inside seams and the top.


3/4 done!

The last wall slides perfectly into position.

Jim climbs on to check out the view.

Just add some plexi-glass and water and we are ready for Shamu!